One Day Gourmet

eating tastier, healthier food on one day a week

Wednesday, May 27, 2009

o for a bit of earth...

Tonight I stole J.'s camera and shot some photos on my way to the last choir rehearsal of the summer. I'm so proud of my little seedlings that I couldn't wait to show them to y'all! I wish I had pictures of the garden-before-it-was-a-garden, i.e. a weedpatch. But alas. I was too excited to dig things out to take photos that day. 

How did our little garden come to be? We asked the dudes-in-charge if we could plant a garden in the weedpatch that bordered the parking lot on the west side of our church's property. Word got out, and a friend D. asked to plant a few things, too. So, we broke sod together, tearing out all the weeds, double digging the beds, and prepping the soil. It's quite sandy soil... perhaps because it's so close to the preschool's playground? :) D. brought in bags and bags of good ol' Vancouver Island Sea Soil, but I just added Gaia Organic Fertilizer to the soil. He already had seedlings started, but I had yet to order all my seeds. I bought them through Bob at The Natural Gardener, and he has become my most valued resource! Most of them came from West Coast Seeds, and I basically went through their catalogue page by page, making a list of everything I wanted to grow.  

Now, all the seedlings are coming up, including the yellow bell peppers, patty pan squash, and bush beans I planted in the last two weeks, and I will have to be creative about spacing and making room for all the plants I have going. I gave a cucumber plant to E. and M. tonight after choir... E. used to work in Africa as an agriculturalist, so I figured he would give the yellow-blossomed plant a good home. 

In the meantime, here are a few photos from the garden: 

Little bull's blood beetlings! I need to thin them out so they'll grow properly. I'm not going to have enough room for all my veggies... it's a serious problem. I've been so blessed to get permission to plant a garden in this space at all, but I have a problem with moderation. Meaning, I don't do anything half-way. So, I planted ALL of my seeds, not realizing that 2 summer squash plants feed a family of FOUR! Plus, they sprawl. I also planted ALL of my pepper, tomato, cuke, beet, carrot, and pea seeds. Oops. 

Arugula seedlings! My friend E. said they look like little hearts. Sweet little hearts I want to put in my mouth. 

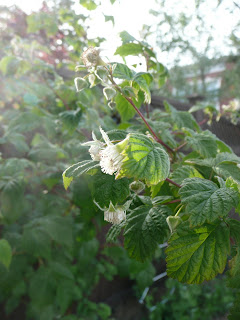
These berry canes were in the weedpatch before we started. When I met a a few neighborhood friends (little two-year old W. and his nanny A.) I found out that they actually "harvested" the raspberries last summer! I pruned and fertilized them, and now they're showing beautiful buds and flowers. I'll have to bake a little tart for W. and A. when August rolls around. 

We trellised our Alderman tall telephone peas on these metal trellises from Ikea. They come in boxes of 9 and you can screw them together to make any shape or height you need. We will definitely be adding to these. I'm sure J. was glad to be doing some "construction" work this last weekend putting these trellises together after digging and screening the last of our four beds last weekend! At the end of that day he said, "I feel like I've been digging holes and filling them back in all day!" Yup. Thank you, my dear husband. 

Our mixed greens (and reds) are growing! Okay, so maybe lettuce isn't sexy to everyone. But I think it's beautiful. Because this is my first year gardening, I'm just ecstatic that anything is growing at all! 

I've been noticing plants, flowers, and veggies everywhere. I've been especially impressed by the rising number of places where Vancouverites are planting veggie beds! It's incredible! 

I happened upon this one just the other day. 

It has been growing right under my nose for years. I walk past this backyard nearly every day on my way from home to my church. Maybe the gardener just put it in... or maybe I'm just growing a new pair of eyes. 

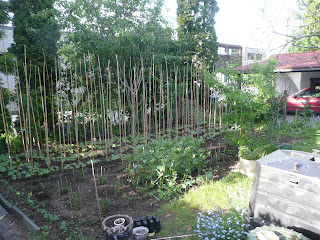
This garden is particularly interesting to me. First, the tall poles all lined up in a row there are deliciously exciting. What is the gardener growing? There were some berry bushes behind the poles, and I noticed at least one fruit tree. There are some things growing in pots, and good Vancouverite that this gardener is, the compost bin is in the front right. 

When I notice these little gardens springing up all over the city, what should I do? Try to take a photo surreptitiously... without seeming creepy? Introduce myself to the gardener in person or by a note left in the mailbox? I'm not shy about chatting with someone who's out in the yard working. After all, since I've started my little garden at church, I've met SO many people from the neighborhood! It's a lovely feeling to see little gardens coming to life in my neighborhood, and I want to make friends with the kind of people who would tear up the sod in their whole backyard to plant a veggie garden. At the very least, I have yard-lust. So, I will garden vicariously through my neighbor-gardeners, savoring my own small bit of earth. 

Friday, May 22, 2009

Honey Hazelnut Cake

This morning I went to visit my friend M. for tea. And I always want something sweet and baked to go with my tea. My ideal cake is one that is light, moist, fragrant, filled with subtle flavors, with an interesting texture. Especially if that texture is slightly caramelized and crunchy on top. Going through the cake recipes on Chocolate and Zucchini (Clotilde's recipes never fail!), the Honey Hazelnut Cake filled all these requirements in my baker's imagination. 

Of course, I made my own adjustments. I find most recipes have too much sugar. This one definitely did, since it called for twice as much (yes, you read that correctly) sugar as it did flour. I changed that ratio around, and because of the addition of melted honey to the batter, I didn't miss the sugar one bit. In fact, next time I might try reducing it even more. I also took Clotilde's advice on doubling the recipe and toasting the hazelnuts. 

You could probably make some substitutions to this cake - trying other nuts instead of hazelnuts, for example - but who wants to mess with a good thing? (Apparently I do, blatantly thumbing my nose at even Clotilde!) The combination of toasted hazelnuts and fragrant honey is ethereal and earthy. (You ask me if this is possible, and I say "yes!") The crust is slightly crunchy, and the inside is a moist and cakey. And what a combo... honey and hazelnuts completely infuse the cake, making it absolutely irresistible. 

I would eat this anytime of the day. Breakfast, tea, dessert, midnight snack... you doubt my gluttony? This is what's left of the cake and it's only 5 o'clock! 

I'm pretty sure J. and I will polish the rest off for breakfast tomorrow. I am also pretty sure I will be making this at least two more times this week. 

Honey Hazelnut Cake 
(adapted from Chocolate and Zucchini)

1/2 cup sugar (or 1/3, if you want a little less sugar, like I might)
1 cup flour (of your choice, unbleached all purpose is just fine)
3 tsp baking powder
1/2 tsp salt
4 eggs
2/3 cups whole raw hazelnuts
10 Tablespoons butter (1/2 cup plus 2 Tbsp)
6 tablespoons honey

Heat oven to 350 degrees Fahrenheit. Have a rack set in the middle of the oven. 

In a medium bowl, whisk together dry ingredients. Add eggs one at a time, making sure each egg is somewhat incorporated before adding the next one. 

Then, toast the hazelnuts. Rub them in a teatowel to remove the brown skins, which can get bitter. Chop them roughly (I pulsed them a few times in my food processor), and let them cool before folding them into the batter. 

Meanwhile, melt the butter and honey in a small saucepan, and let it cool just a bit before adding it to the batter. Fold in until just incorporated. 

Pour batter into a greased and floured cake pan or tart pan (I did mine in my tart pan, as you can see in the photo above), and make sure the top is level. 

Bake at 350 F for 25 - 30 minutes, until the middle of the cake is set and the top is golden brown. Serve with a little bit of whipped cream, or just as it is, slightly warm. 

I could also see this cake modified a little bit to make a stunning informal layered cake. Reduce the sugar to 1/4 cup, and make a double batch. Bake the batter in two separate cake pans, and layer the cakes when cool with whipped cream flavored with honey, and perhaps a little buttered rum? Go nuts. 

Wednesday, February 25, 2009

Snowboarding SnackPacks

Okay, okay, I get the picture. Post a new recipe already, Tora!

Last week some friends of ours flew in from Toronto for a weekend of skiing at Whistler. I was more excited to "play mom" than to get my rear end flattened and my knees knocked out by hard-packed snow. This is only my second season boarding, you know. Give me a break. However, being a dutiful wife to my snowboarding husband, I got up at 6.00am with everyone else to drive up to Whistler for a day on the slopes.

Wouldn't you know it? I barely made it down one run. One green run, nonetheless. By lunchtime I was ready to call it a day and go sip cocoa in front of a TV while wearing warm clothes. Oh, and get the feeling back in my toes.

But, the highlights of the day were: beautiful clear blue skies, a comfortable temperature, good friends, stunning views from the Peak2Peak Gondola, and tasty snacks. On the ride up we had blueberry-banana muffins topped with a oaty-cinnamony-brown-sugary streusel, and I sent everyone up the lifts with snackpacks of homemade granola bars and sugar baby mandarins.


So, my friends. Today, as penance for not posting since November 24 (shame, I know), you will get two recipes. For the days ahead of skiing and snowboarding which I hope will come to all of us. I, however, plan to stick to the local mountains (Seymour, Grouse, Cypress) in hopes of mastering the bunny hills by the end of this season so I don't continue this trend of breaking myself attempting to slide down a hill while nailed to a plank of wood, trying desperately to look cool.

Road-Trip Blueberry Banana Muffins

1 1/2 cups all-purpose flour
1/2 cup whole wheat flour
3 tsp baking powder
1 tsp baking soda
1/2 tsp salt
1/4 cup brown sugar

Preheat the oven to 350 degrees Fahrenheit. Whisk together dry ingredients in a medium bowl. Set aside. In a small bowl, using a pastry cutter, blend the following until it forms pea-sized lumps:

1/3 cup oats
1/3 cup whole wheat flour
1/3 cup brown sugar
1/3 cup butter, softened
dash of cinnamon

Set the streusel mixture aside. In a large bowl, whisk together:

1 large ripe banana, peeled and mashed
1 cup buttermilk
2 eggs
3 Tbsp oil
1 tsp vanilla

Stir the dry ingredients into the banana-buttermilk mixture, until it is just mixed. DO NOT OVERMIX! Fold in:

1 cup fresh or frozen blueberries

Spoon the batter into greased muffin tins. Top each muffin with a teaspoon of streusel, patting it down gently so it just sticks to the batter.

Bake muffins for 20-25 minutes until the muffins are puffy and the streusel is golden brown and you just can't wait any longer to eat them.

ALTERNATIVE RECIPE:
To make apple-streusel muffins, substitute one cup of unsweetened applesauce for the banana, and add 1 tsp of cinnamon to the flour mixture. Top with streusel and bake just as for the blueberry-banana muffins.


Granola Bars (to make you swear off Chewy forever)
adapted from a forum post on 101cookbooks.com

Preheat oven to 325 degrees Fahrenheit. In a large bowl, stir together:

4 cups old-fashioned rolled oats
1/2 cup whole-wheat flour
1/2 cup unbleached all-purpose flour
1/3 cup brown sugar
1 tsp baking soda
1 tsp cinnamon
1 tsp salt
1/2 cup shredded unsweetened coconut
1 cup of dried fruit of your choice (I like cranberries, but cherries, blueberries, or raisins would all work fine here)
1 cup of nuts, whole or lightly chopped (I like whole almonds, but peanuts, cashews, pecans, hazelnuts, would all be delicious!)
1/3 cup chopped chocolate-covered espresso beans (optional... but highly recommended)

In a pyrex liquid measuring glass, stir together:

1/2 cup butter, cut into chunks
2/3 cup honey
1/2 cup peanut or almond butter

Microwave for a few minutes until you can stir it into a smooth mixture. Add:

2 tsp vanilla

Pour the liquid honey/butter/peanut butter mix over the dry oat mixture, tossing to coat everything evenly (this is to ensure your bars stick together!). Pour the mixture into a 9 inch X 13 inch pan, lined with parchment paper (or greased and floured... but you don't really want more grease in these bars), leaving enough paper hanging over for you to pull the bars out of the pan. Press down firmly on the mixture to make sure it will stick together.

Bake at 325 degrees Fahrenheit for 20-25 minutes. Let the pan cool on a rack for 10 minutes. Then, getting your roommate, husband, or boyfriend to help, grab two opposite sides of the parchment paper while s/he grabs the other side (a large spatula slid under the bars helps immensely), and lift the bars out of the pan and let them cool on a rack (still on the paper) until they are completely cool and set.

Cut into small-ish sized bars and wrap in plastic or tinfoil. I underestimated the richness of my bars, and so cut pretty large ones. Taste a bit of yours before you cut so you know how much you can stand to eat in one sitting. These are pretty packed with energy!

Monday, November 24, 2008

Everyday Granola

I haven't baked in a long time. The last few months have been an uphill slog in terms of energy and motivation to get anything accomplished... although sometimes it also felt downhill, in a bad way. Like a heavily-loaded cart was behind me, threatening to run me over with its weight.

So I'm now seeking solutions to lighten the load, or increase my strength and ability to hold the cart up behind me, to keep it from running me over. One of the first places that brings me strength is my morning breakfast. After a long warm night of being curled up between a heavy comforter and a soft pillow, I need something truly inviting to coax me out of my downy berth. My first companion is a french press filled with strong, dark (preferably African) coffee spiked with sweet cinnamon and topped off with a generous splash of Avalon cream. So, there is no better candidate than a bowl of hearty, slightly sweet, spicy, crunchy granola to sidle alongside it to sing me a sweet ode to the coming day.

I've tried a few granola recipes, but to be honest, the best granola I've made and tasted is the granola that happens to come into being when I'm particularly in touch with the season. In the late summer my friend E. gave me a bag of granola that included dried Moreno cherries, pistachios, and was sweetened by brown rice syrup. But now that we're headed resolutely for winter (and this week is Thanksgiving in the States), I'm craving granola that is creamy, and definitely spicy. Ginger must be roused from its summer slumber in my spice cabinet. Cloves called to duty from their relegation to spiking orange slices for apple cider. Nutmeg liberated from its monotonous, monogamous relationship with pureed pumpkin to gently but passionately love all things (may we all be delivered from monotony, but all be blessed with monogamy). Cinnamon, ever ready with its sweet and faerie disposition to lighten what is heavy, to call forth the truest essence of all flavors, to gather together the unruliest of spices in one sweet chord.

If you, like me, appreciate being able to make your own flavors and permutations of everything, then it's most helpful to know the ratio of the kinds of ingredients, rather than specific ingredients to which you are bound. For example, muffins are about 50 percent moisture, so to a cup of buttermilk, or yogurt, or applesauce, you add only enough flour and egg to hold it together. This recipe is kind of like that. Oats are always a base ingredient. Then, some fat, some sweetener, spices, and whatever nutmeats or seeds you have on hand. Then everything is toasted in the oven slowly to bring it all to a golden perfection. Topped with some old-fashioned yogurt from a local creamery, or a splash of cream... there's nothing better to bring you into the day.

Everyday Granola

3 cups of whole rolled oats (not the limp, emaciated, quick cooking kind, but the most generous, plump grains you can find)
1/2 cup to 1 cup of any combination of: whole wheat flour, wheat germ, wheat bran, flaxseed meal, powdered milk, or anything to hold the spices to the oats

1/4 to 1/2 teaspoon of salt (the perfecter of all flavors)
1/2 teaspoon of cinnamon (remember, it is the unifier of all spices)
1/4 teaspoon of any of the following (keep the unruly ones in line!): nutmeg, cloves, ginger, cardamom
AND if you're feeling adventurous or in the need of some serious courage in the mornings....
1/8 teaspoon of something spicier: cayenne or finely ground pepper

3 to 3 1/2 cups of chopped nutmeats and/or seeds (almonds, cashews, pistachios, hazelnuts, walnuts, pecans... sunflower, flax, sesame, pepitas, pumpkin... use your imagination! I usually combine at least three or four kinds of nuts and seeds)

1/2 cup of melted butter or oil (canola, peanut, olive... just make sure that if it's something with a pronounced flavor, like olive, you cut it with something milder)
1/2 to 3/4 cup of sweetener (honey, agave nectar, brown rice syrup, brown sugar... but for heaven's sake DON'T use plain white corn syrup or white sugar. Let us have some small measure of reverence for the cold winter months.)

up to 1 cup of dried fruit of your choice (berries, cherries, apricots, apples, currants... or, if you must, raisins)

Heat your oven to to 300 degrees Fahrenheit.

In a large bowl, combine the oats and all of the dry ingredients: flours, ground flax, salt, spices, and nutmeats/seeds. And, if you are using dry sugar instead of liquid honey or another sweetener, add the sugar here. Give it all a good stir to make sure the spices don't all fall to the bottom. Get your hands into that bowl. It's good for you, and for your granola.

In a large glass measuring cup, heat the oil and your sweetener of choice in the microwave. Give it a good stir with a fork or small whisk to combine as best you can.

Pour the liquid over the dry ingredients, and stir until it is all coated well. This is where you will get your first breath of the spices coming alive.

Pour out half of your granola onto a large rimmed cookie sheet (DO NOT use a flat cookie sheet with no edges... it will cause havoc in your oven and you will lose most of your granola in the process), and spread it out in an even layer. Break up any large clumps.

Bake it for 25-30 minutes total. Every ten minutes, pull out your granola and stir it with a spatula so that none of your clumps gets burned. The third time you pull it out and stir, gauge if it needs another full ten minutes. It will usually need another 5-6 minutes.

Once it looks nice and toasty brown, put the granola on another COOL baking sheet to cool. It will crisp up remarkably once it cools. Store in an airtight container, and keep it dry and cool (i.e. NOT in your trunk in the sun on a summer's day... I speak from experience here) until you eat it.

If this batch of granola lasts in your home longer than a week, I take it all back.

Friday, October 3, 2008

Every Day Fruit Crisp

In More With Less, Doris Longacre Janzen ponders the purpose of dessert. Is it to add unnecessary calories to our diets? Is it to lengthen the dining experience? Is it actually a practice of gluttony? She writes that, instead, dessert can be an opportunity to add a few more nutrients to the meal. I would agree, and would also add that it can be one of the best times to truly appreciate the culinary bounty of any season: spring, summer, winter, or fall.

I am a fruit-a-holic. All winter long I feast on bursting juicy oranges. I pine for the summer berry fields - strawberries in early summer, raspberries and blueberries in high-summer, the late summer stone fruits - cherries, apricots, peaches, plums, and the final stretch into fall filled with harvest pears and apples and Saturday morning forays into wild blackberry patches.

You must understand, then, that my go-to dessert, my favorite of all, is one that preserves, even enhances the fresh beautiful textures and flavors of perfectly ripe, perfectly sweet summer fruits. The recipe is for a fruit crisp topping that can be piled on top of any fresh fruit. I've done this with apples, pears, a raspberry-blackberry mixture, and a few weeks ago with peaches. Having filled my freezer with berries, I hope to make a few apple-blueberry crisps as the fall winds its way into winter.

So when my friend Farnaz tasted the peach version of this fruit crisp, she immediately said, "I need this recipe!" However, she immediately followed that with a comment on her inexperience with baking. This recipe is much easier than pie. It's easy enough to make on a whim for a home-cooked meal, and elegant enough to take to a dinner at a friend's house to be topped with floppy whipped cream or vanilla ice cream.

So for you, Farnaz, for special days and for every day, my favorite fruit crisp.

Fruit Crisp

1/2 cup brown sugar
3/4 cup flour (whole wheat or white)
3/4 cup large flake oats
1/2 cup softened butter
1/2 tsp each cinnamon and nutmeg
(or, any other spices to complement the fruit you are using... like ginger with pears, etc.)
a dash of salt

In a bowl, stir together everything except the butter. Then, cut the butter into small chunks and add that to the dry mix. Using a pastry cutter (or better yet, your hands!), cut the butter into the dry ingredients until there are no big lumps of butter, but the whole mix is about the consistency of peas.

Pour this topping onto 4 cups of chopped fruit, or berries, or any mix of fruit you like. Bake at 350 degrees Fahrenheit for 30 minutes. Berries may cook more quickly than other fruits such as apples or pears. The ripeness of your fruit will also determine cooking time. The final test, though, is that the top of the crumble is golden and toasty, and the fruit offers little resistance to a fork.

Serve warm, with whipped cream or ice cream.

Leek-y-Dill Italian Sausage Soup

My friend Lindsey has wonderful food ideas. She gave me the inspiration for this recipe, which was handed to her from a friend of hers, very informally: "Oh, take some sausage, leeks, potatoes, tomatoes, and dill and throw it all together. Easy!"

I've now made this soup a number of times and have gotten rave reviews from all. It's hearty enough for my carnivorous husband and herby enough for my own taste. If I were to rate this soup on a scale of spring-summer-winter-fall, this would be a "winter". The interplay between the caramelized leeks and fresh dill is intriguing and unexpected. Served with a buttered crusty roll, there's nothing better to warm you on a winter's day.

I have no idea what to call this soup. Ideas, anyone?

Leeky Dill Italian Sausage Soup

1 package (about 5 large sausages) of hot italian sausage, de-skinned
2-3 medium leeks, cleaned and diced
2 large russet potatoes
1 large can diced tomatoes
water or vegetable broth
1 bunch of fresh dill (it MUST be fresh, there is no substitute!)
salt and pepper

In a large cast-iron skillet, sauté the sausage meat until browned and cooked through. Drain the fat off, reserving it in a bowl to use for caramelizing the leeks. Move the sausage to a large stock pot. In the skillet again, use about a tablespoon of the sausage fat to caramelize the leeks. They should be just browned on the edges and still a vibrant green. Put that into the stock pot with the sausage. Add the potatoes, roughly chopped, to the stockpot, along with the can of diced tomatoes. Add enough water or vegetable broth to cover all the ingredients, and bring it to a boil. Simmer until the potatoes are tender.

10 minutes before serving, remove any stalks from the fresh dill and roughly chop it, so there are no large "bunches" of dill, just small sprigs. Stir that into the soup and let the dill flavor become vibrant.

Trudy's Yummy Yammy Soup

A few weeks ago my book club got together. This month we met at Trudy's house. She started off the dinner with an amazingly delicious, spicy-sweet soup that seemed to warm even my lungs as I breathed in. All of us pleaded for the recipe, and she sent it along a few days later.

So, when I was preparing to host an informal fall lunch after church, I knew exactly what I was going to make. However, it didn't turn out like Trudy's. Mine turned out more like a bisque - thick and creamy with not nearly as much zing as her soup. Still, it was a fantastic success! I had to scrape the pot at the end of the day to get a bite.

Here's my incarnation of Trudy's soup.

1 onion, roughly chopped
3-4 cloves garlic, peeled
grated ginger - about a thumb's worth
3-4 medium yams, peeled
2-3 carrots
1 apple, peeled and cored
water or vegetable broth
1 can coconut milk
salt and pepper
(optional) cayenne, cinnamon, other spices...

Sauté the onion and garlic together until soft. Toss in the grated ginger. Add the chopped yams, carrots, apple, and enough water or broth to cover the veggies. Simmer until the yams and carrots are fork-tender. Stir in your can of coconut milk. Then, using a hand blender, puree the soup until it's smooth. At this point you can add more water to thin the soup to your desired consistency. It should coat the back of a spoon. Salt and pepper to taste!

This soup does well made the day before. If you refridgerate it overnight, it will thicken too. Just add some more water as you reheat and adjust your seasoning to taste.